
Contents
- Camera Controls - P, A, S, M modes and Autofocus Modes
- Focal Length Choice
- Aperture and Shutter Speed Choice
- Principles of Composition
- Understanding Flash
- Workflow and Post-Processing
Recap
Let's recap what we should already know about aperture, shutter speed and ISO.
- Aperture refers to the size of the opening in your lens. A larger aperture, of course, means that your lens is letting in more light.
- Shutter speed refers to how long your shutter stays open. A slower shutter speed means the shutter stays open for longer, thus, more light.
- ISO refers to the sensitivity of the camera's sensor. A higher ISO means the sensor is more sensitive, so effectively, more light.
Keep ISO Low
Before we look at aperture and shutter speed, both of which are quite interesting and important, we should touch on ISO first. Of the three ISO is the most boring, because it doesn't really pertain to any artistic effect. We always want to keep ISO as low as possible.
I view ISO as a last resort, when we can no longer increase the amount of light reaching the sensor by playing with our aperture and our shutter speed, we then think about our ISO and we can increase our ISO to get to the required exposure. Using a high ISO introduces noise, grain and degrades the overall image quality.
Thus, we should only be increasing our ISO when it's completely required. We'll come back to this. But now let's look at aperture.
Aperture and Aperture Priority Mode
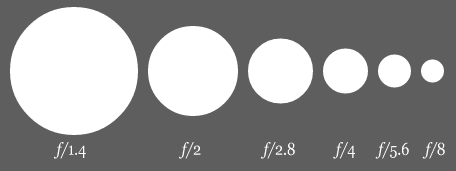
Aperture refers to the size of the opening in the lens. The way we measure aperture is the f-number (f-stop). This is really important, aperture and f-number aren't the same thing. It's similar to how we measure distance using meters.
At first, the concept of an f-number might be strange, because aperture is just the size of an opening - so wouldn't a measurement of area or even diameter make more sense? Perhaps, but as you'll come to understand, the longer the focal length of a lens, the larger the opening needs to be to let in a particular amount of light. Let's say we have a 50mm lens and a 150mm lens. In order to let in the same amount of light, the 150mm lens needs a larger opening than the 50mm lens. Thus, the size of the opening is not a great measure, it's an absolute measure, not a relative measure. We use the f-number because it is a relative measure. A lens at an aperture of, say, f/1.4 will always let in the same amount of light as another lens of the same aperture, regardless of the focal length.
To understand how f-numbers work, we need to look at the formula for working out the f-number.

Here, N refers to the f-number. Also, f refers to the focal length and D refers to the diameter of the opening. It's really important to notice that for any particular focal length, a larger opening (i.e. D is bigger) will lead to a smaller f-number (i.e. N is smaller). Thus, at f/1.4, the opening is larger than at f/2.8.
In 'A' - Aperture Priority Mode (Canon calls this Av), we can tell our camera to use a particular aperture, so it opens the lens up to the particular f-number we've assigned and then it will select the shutter speed for us. So far, we've been using 'P' mode, where the camera chooses both the aperture and the shutter speed. Now, we can use 'A' mode which allows us to choose the aperture required.
Since the camera is still making some decisions, like with 'P' mode, sometimes the camera might make the photo too dark or too bright. You can continue to use Exposure Compensation, just like you have been under 'P' mode in order to make the scene brighter or darker. However, under 'A' mode, the camera will only initially slow down the shutter speed. When it reaches the minimum shutter speed set, it will then increase the ISO. It does not change the aperture to adjust its exposure.
NOTE: You need to ensure that Auto ISO is on. This can be adjusted in your Shooting Menu. Turn ON Auto ISO and leave the Minimum Shutter Speed at AUTO. If there's no option here for AUTO, leave the Minimum Shutter Speed at the reciprocal of your approximate focal length. E.g. if you're using a 50mm lens, then leave it at 1/50s. If you use a zoom, use the longer focal length.
If you want to understand more about aperture, I highly suggest going through the ADVANCED material below, which goes into much more depth about the mathematics and technical side of how aperture works. However, if you want to skip it, everything above should be enough for practical photography. Feel free to jump to the next section on the artistic implications of the aperture if you want to get out and about shooting as soon as possible.
ADVANCED: You can also interpret aperture in terms of stops. Recall how we have discussed that a stop refers to a doubling of light such that 1 stop means double the light, 2 stops means four times and so on. With aperture, a doubling in the area of the opening will result in a doubling in the amount of light hitting the sensor. However, since the f-stop is related to the diameter of the opening and not the area, it is a linear, not quadratic measurement. On top of that the f-stop is a related to the reciprocal of the diameter. Thus, for a doubling of light (i.e. one stop more), the f-number decreases by a factor of 1.4 (the square root of 2). The opposite is also true, so for a halving of light (i.e. one stop less), the f-number increases by a factor of 1.4. Thus, an f/1.4 lens lets in half the amount of light (one stop less) than an f/1.0 lens. An f/2.0 lens lets in half the amount of light as an f/1.4 and so on and so forth. The full stops going down (i.e. light halving) are f/1.4, f/2.0, f/2.8, f/4, f/8, f/11...etc. Notice that each successive number is just the prior number multiplied by 1.4.
ADVANCED: Unlike aperture, shutter speeds and ISO are linear measurements. Thus, a shutter speed of 1/50 seconds lets in twice as much light as a shutter speed of 1/100 seconds. Thus, we can use this to see how our camera's exposure compensation works. Let's say we are at a particular aperture, f/2.8. The camera takes a reading and determines that 1/100 seconds at ISO100 is appropriate. If we decide that this is too dark, pushing the exposure compensation to +1.0 will increase the amount of light by one stop, i.e. a doubling. Thus, keeping the aperture the same, the shutter needs to be open for twice as long, so the camera will now go to 1/50 seconds at ISO100, or if the minimum shutter speed has already been reached, it has to increase the ISO, so perhaps 1/100 seconds at ISO200.
ADVANCED QUIZ: I'm currently at f/4, the camera decides on 1/250 seconds at ISO100. If I change the aperture to f/8, what would the shutter speed be, assuming there is no minimum? ANSWER: Since f/8 is two stops below f/4, the shutter needs to be open for four times as long, i.e. 1/62.5 seconds, but the camera will probably round to 1/60 seconds.
Artistic Implications of Aperture
Apart from controlling the total amount of light in a shot, aperture also has artistic implications. Thus, we cannot just adjust aperture up and down to work with the amount of light we have.
Perhaps the foremost implication of the aperture is that lenses with larger apertures are heavier and more expensive. This is why photographers pay so much for lenses which are f/1.4 or f/1.2. They have superior light catching ability which makes them extremely useful in low light. Thus, how much you can open up your aperture depends on the lenses you own or are willing to pay for and carry around.
Secondly, lenses are rarely at their peak sharpness when shot wide open. Thus, we need to do what is called 'stopping down' the lens. This is photographic speak for using an aperture which is smaller than the maximum the lens allows. Generally, this allows us to shoot sharper images. For example, a lens that is f/1.4 might not reach its peak sharpness until we close it down to f/4, for example.
Now's the most important impact of aperture - the depth of field. A larger aperture (smaller f-number) causes the depth of field to be thinner, essentially, what this means is that less will be in focus. This is easier to illustrate with pictures. Thus, we'll use two pictures here, one shot at f/8 and one shot at f/1.4 to demonstrate the difference.
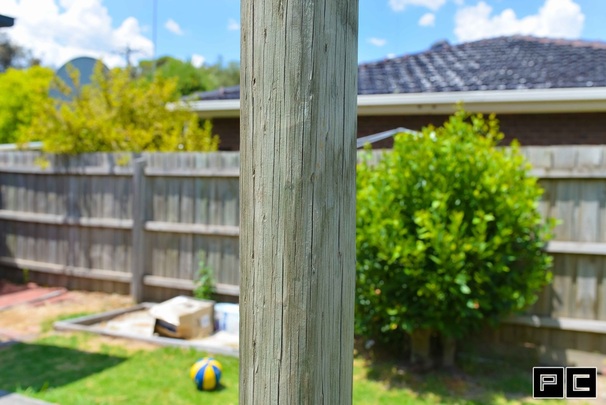
Nikon D600, Sigma 35mm f/1.4 ART, f/8, 1/250s, ISO100
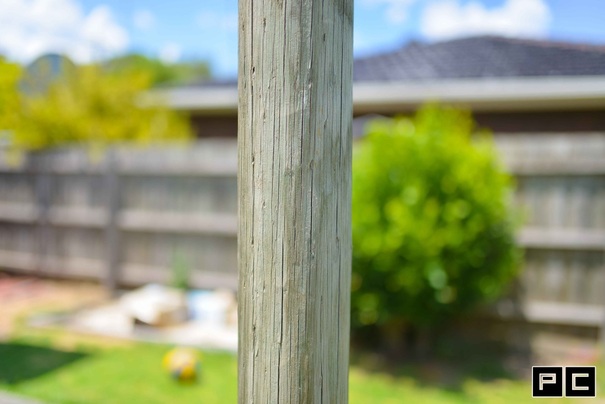
Nikon D600, Sigma 35mm f/1.4 ART, f/1.4, 1/4000s, ISO100
You can see how the larger aperture throws the stuff in the background out of focus. Sometimes this effect might be desirable. For example, with portraits, we often want to throw the background out of focus so that we can achieve a cleaner look. This helps when we can't find a clean background to shoot against. Thus, in cases like this, we want to use a larger aperture to achieve that look. Of course, the downside to this is that sometimes we might be letting in too much light. For example, we might want to shoot at f/1.4 to achieve that blurred background look, but in direct sunlight in the middle of the day, shooting at f/1.4, even at the lowest ISO (usually ISO100) and fastest shutter speed (usually 1/8000 seconds), we still might be letting in too much light, so we can't decrease the exposure further without decreasing the aperture.
NOTE: This is rarely a problem because 1/8000 seconds is extremely fast and should be enough for most apertures in direct sunlight. However, a bigger problem is using flash, since flash limits the shutter speed to around 1/200 seconds, it severely limits the aperture we can use in bright conditions without overexposing our image. Thus, there are times where we need to use a smaller aperture (greater f-number). The stop-gap solution to this problem is using a neutral density filter, but that introduces problems of its own - you just really need to close down the aperture.
Of course, there are times where we might want a greater depth of field. For example, with landscape shots, we don't want our surroundings or background to be out of focus, otherwise, we're not getting a sharp shot. Thus, with landscapes, we are shooting with smaller apertures. Of course, the trade-off here is that we are sometimes struggling to get enough light, thus, we will need to use slower shutter speeds and higher ISOs in order to get the exposure required. Of course, the issue is that using shutter speeds that are too low can induce blur (we'll look at that in just a second), thus we need to use a tripod. Increasing the ISO, as we already covered before, increases noise.
Hence, aperture is a great tool for controlling the look of our images, but it also has implications on exposure that we need to be aware of so that we don't end up letting in too much or too little light that our other factors cannot compensate for. Of the three factors, aperture is probably what most photographers, apart from those who shoot sports and action, care about most. That's why so many photographers shoot in 'A' mode.
Shutter Speed and Shutter Priority Mode
The shutter speed measures the amount of time the shutter is open, allowing the sensor to capture light. Perhaps it is a little misleading because it's not actually measuring a speed, it's simply just measuring an amount of time.
Unlike aperture, the shutter speed is very easy to understand. For most general photography, the shutter speed is measured in fractions of a second - for example, 1/50 second. For landscape and night photography, on tripods, sometimes the shutter speed can be measured in full seconds, for example, 1 second or 2 seconds, sometimes even 30 seconds.
Shutter speed is a linear measurement, so if we double the amount of time the shutter is open for, we let in twice the amount of light - i.e. a stop more. The opposite is also true, halving the time the shutter is open for will let in a stop less of light.
In order to control the shutter speed, we use 'S' - Shutter Priority Mode (Canon calls this Tv). In this mode, we set the shutter speed to a particular number and the camera changes the aperture and ISO in order to get what it thinks is the correct exposure. Like with the other modes we are now familiar with, when the camera gets it wrong, we can use exposure compensation in order to adjust the exposure to what we think is best.
So far, we're already familiar with 'P' mode where the camera decides everything and 'A' mode where we choose the aperture. Like both these modes, we need to use Auto ISO so that the camera can automatically increase the ISO when required rather than needing us to jack up the ISO ourselves. It makes it much easier and more convenient.
Artistic Implications of Shutter Speed
Generally, there are two cases where we want to shoot in Shutter Priority - when we want a really fast shutter speed to capture action or when we want a really slow shutter speed to blur motion. These are almost the two extremes. For everything in between, e.g. capturing people, the shutter speed doesn't really matter as long as it is fast enough to stop camera shake. I don't really have examples of where we want to use a fast shutter speed or slow shutter speed, as I'm neither a sports nor landscape photographer, but I've tried to make the following two pictures so you can see what I mean by stopping motion and blurring motion.

In order to determine what is an appropriate shutter speed to stop camera shake, we often use the inverse law. This law tells us that, on average, we need to be shooting at least at the inverse of the focal length or faster to have sharp shots. For example, if we are shooting a 50mm lens, we need to be at 1/50 seconds or higher. If our lenses have VR or IS, we can usually shoot at slower speeds. Most cameras, when using Auto ISO can determine this automatically using the AUTO setting for minimum shutter speed. If we want to shoot at a slower shutter speed than what the inverse law says is best, for example to blur motion, we need to use a tripod.
Like with aperture, there are trade-offs. We might want a fast shutter speed or slow shutter speed because of what we are shooting, but this places a demand on the other factors in order to keep exposure correct.
Shooting at high shutter speeds, e.g. for sports or action, places a demand on the amount of light received. This means that we need to be shooting at really large apertures or really high ISOs in order to get enough light so that our shots are properly exposed. This is why sports and action photographers are always on the quest to find cameras with cleaner high ISO outputs and lenses with larger apertures. This is the trade-off for shooting at high shutter speeds.
Shooting at low shutter speeds, e.g. for landscapes where we want to blur the motion of water, sometimes allows in too much light. This means that even with the aperture closed all the way down and the ISO already at the lowest setting, we are still allowing in too much light. For this situation, we need to use neutral density filters to cut down the amount of light hitting the sensor. These cause a whole host of their own problems - including reducing sharpness and tinting the colour. This is the trade-off for shooting at low shutter speeds.
Manual Mode
'M' - Manual Mode is where we adjust both the aperture and the shutter speed. Some people, today, insist on shooting manual mode all the time, but for most, I would say that it is an unnecessary pain, especially when you very rarely need to control everything and the camera is often smart enough to control what you leave out.
We can choose to leave Auto ISO on or off.
If we leave Auto ISO on, essentially we set our aperture and shutter speed and the camera chooses the ISO that will give us the correct exposure at those particular settings. Again, we can use the Exposure Compensation to increase or decrease the brightness, essentially the camera will just increase or decrease the ISO accordingly. This is how I shoot when in manual. For example, if I am shooting a social event and I want to stay at 1/100 seconds to stop human motion and I want to shoot at f/1.8 to get a shallow depth of field and throw backgrounds out of focus, I might choose to shoot in manual mode with Auto ISO, so the camera just chooses the appropriate ISO to get the right exposure.
If we turn Auto ISO off, we end up in full manual, where we control everything. Of course, in full manual, there is no Exposure Compensation because the camera is not calculating anything for us to need to compensate. We simply experiment, dial in different settings and then try again if the exposure isn't right. For example, if we take a shot and it's too dark, we can either open up our aperture, slow down our shutter speed or increase the ISO to increase the overall brightness.
I never use full manual, but some photographers, especially those shooting landscapes, often require the fine control that it allows. For almost all other applications, the semi-auto modes will do very well, even if they don't, Manual with Auto ISO is almost always the best. If you think about it, the reason why you enter manual mode is to control both your aperture and shutter speed. So if you're fixing both of them, what you'll be doing is jacking up or down the ISO to get the right exposure anyway, so you might as well just let the camera do it for you.
But then and again, some photographers who grew up in the manual days before automation was invented hate the other modes with a passion and continue to use manual mode. That's completely fine, but for me, I prefer to let the camera calculate the settings for me and only change them when I need a particular artistic effect, as we talked about above.
Summary
This is by far one of the most important and longest sections, so let's summarise what we've learned from an exposure point of view:
We use each of the P, A, S, M modes to achieve different artistic effects:
We need to remember that even though each of the aperture and shutter speed can be changed to control artistic effects, they will have an impact on the other factors. Sometimes, the other factors can compensate so we can get the artistic effect we want, but sometimes they can't and we might end up with an image that is overexposed or too noisy (as the ISO is too high).
- Larger apertures (smaller f-numbers) let in more light, brightening our image.
- Slower shutter speeds let in more light, brightening our image.
- Higher ISOs make the sensor more sensitive, brightening our image. It also increases the noise, which is bad.
We use each of the P, A, S, M modes to achieve different artistic effects:
- We use 'P' mode when we want the camera to choose both the aperture and shutter speed. We can adjust the overall brightness by using exposure compensation, which causes the camera to possibly change all three factors to achieve the right exposure.
- We use 'A' mode when we want to control the depth of field. Setting a larger aperture (smaller f-number) will allow us to throw backgrounds out of focus - good for portraits. Setting a smaller aperture (larger f-number) will allow us to keep more in focus - good for landscapes. When adjusting exposure compensation, the camera only changes the shutter speed and ISO.
- We use 'S' mode when we want to control the amount of blur. Setting a fast shutter speed will allow us to reduce the blur, the faster the movement, the faster the shutter speed required. Setting a slow shutter speed will allow us blur movement, such as water in landscapes, giving us that milky smooth look. When adjusting exposure compensation, the camera only changes the aperture and ISO.
- We use 'M' mode when we want to manually select both the aperture and shutter speed. This is sometimes useful in landscape photography where we want to, for example, blur the water movements, but keep all of our shot in focus - using a small aperture and slow shutter speed.
We need to remember that even though each of the aperture and shutter speed can be changed to control artistic effects, they will have an impact on the other factors. Sometimes, the other factors can compensate so we can get the artistic effect we want, but sometimes they can't and we might end up with an image that is overexposed or too noisy (as the ISO is too high).
